PackRatFinder
A Simple Utility to Help Find PackRats
by W3SZ 2/20/2016 (updated 06/01/2020)
NOTE: If you are going to download PackRatFinder, read Section #10 Downloads first. It will save us both a good deal of time! Here is a quick summary of PackRatFinder's main features: Table of Contents (Click on a section to go there): 1. Introduction 1.1
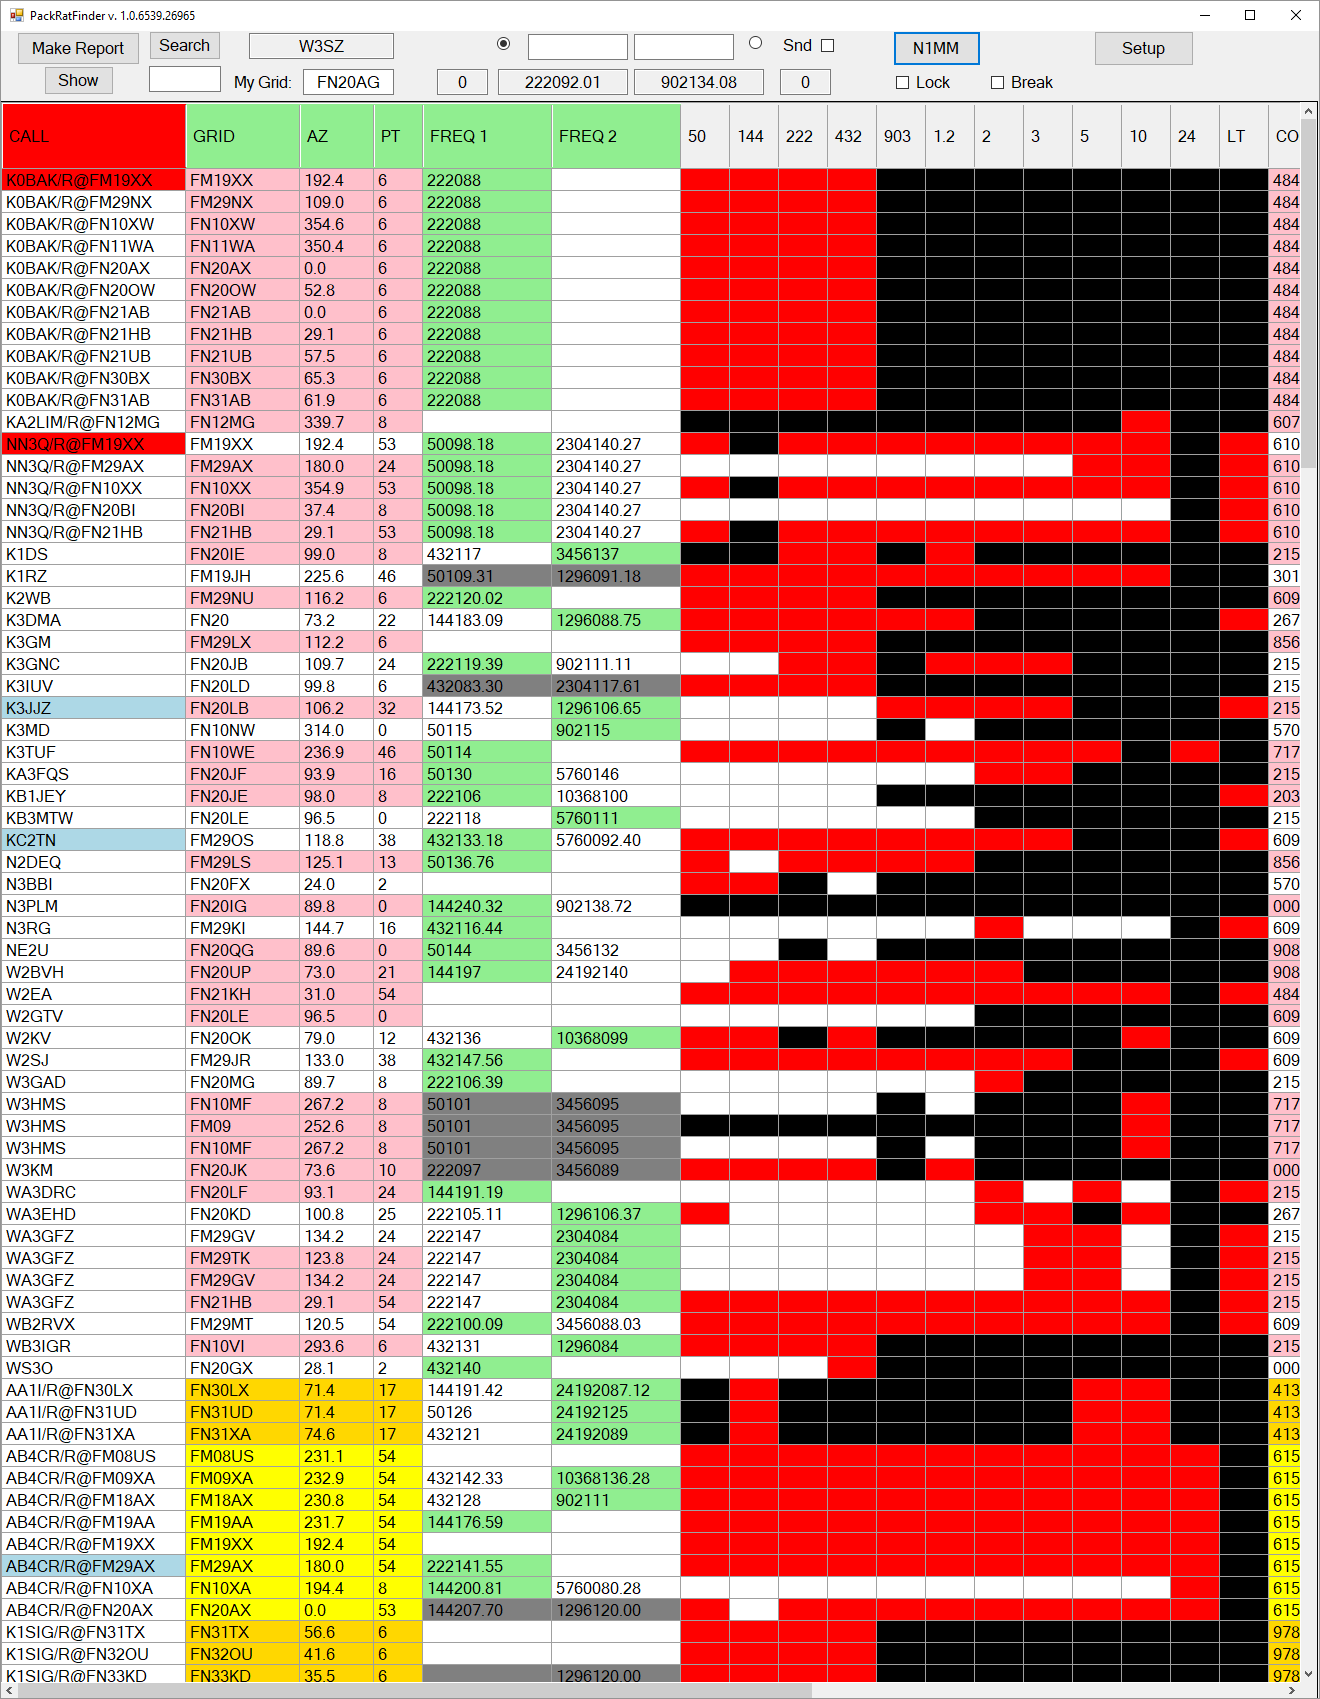
On the left above is the PackRatFinder Station-Band grid
as it would have looked before the January 2016 ARRL VHF
Contest. On the right is the grid as it looks after
logging (in N1MM) my contacts from the January 2016 ARRL VHF
Contest. The goal during the contest is to eliminate the
Red!! PackRatFinder shows you what Pack Rats
you've worked on every band that you have and those you still
need to work. It shows you what frequencies each Pack Rat is
on RIGHT NOW. It also tells you which Pack Rat Rovers are on
site and operating and which ones are in motion and not
operating. 1.2
One of my goals during each VHF contest is to work as many
fellow PackRats as possible. Three of my frustrations have
been [1] the difficulty of tracking my progress in this regard
during the contest, [2] failing to discover on what frequencies
specific PackRats have been hanging out and therefore missing
the opportunity to work them, and [3] missing rover contacts.
I made a C# application that I have named "PackRatFinder"
to help out in this regard. If a sufficient number of Pack Rats
use this program, we should be able to greatly increase our
individual scores, our Club score, and our fun! The Main Features of this program are the
following: 1.3
[1] When first started (after you have set your call
sign, grid, and bands of operation), the program displays a line
for every PackRat (or a line for every grid square for PackRat
rovers). On each line, each band that PackRat station has
available and active "on the air" is shown as a red cell, and
those bands that the PackRat does not have available are shown
in black. 1.4
[2] When the PackRat running the program works
another PackRat station on a band, the cell for that band for
that other PackRat station changes from red to white on the
PackRatFinder display. Thus it is easy, at a glance, to keep
track of your progress in working fellow Pack Rats during the
contest. 1.5
[3] If a fellow Pack Rat is using PackRatFinder with N1MM+
then his current N1MM+ frequency, or Radio One and Radio Two
frequencies if he is operating SO2R, will be displayed in the
5th cell (or the 5th and 6th cells if he is operating SO2R) in
his row on the display, labeled "FREQ1" (or "FREQ1"and "FREQ2"
if he is operating SO2R). The cell for the radio/frequency that
has "focus" in N1MM+ will be displayed with a green background,
and the other radio/frequency will be displayed with a white
background. If these "spots" are more than 5 minutes old, then
the cell backgrounds will be gray. If you hover the mouse over
one of the frequency cells, the Tool-Tip will tell you the
number of minutes since the last "spot" for that station. The
spots are updated every time a station changes frequency or
focus, or every 5 minutes if no such changes occur.
PackRatFinder polls the server every 5 seconds looking for new
spots. Note that even if you are not using
N1MM+ with PackRatFinder, you can still see spots from those
Pack Rats who are using N1MM+ with PackRatFinder (assuming
that they have set up the programs properly). Also, if you are
not using N1MM+ you can manually enter the frequencies for
which you want to be spotted for one or two radios, and you
can select which radio has focus by clicking the radio button
next to that radio's frequency entry box. Frequencies
for stations that have manually spotted their frequencies will
be displayed in the same columns as the N1MM+-spotted stations.
I would recommend that if you are entering your spots manually,
you enter them as kHz, using an integer, such as 50125 or 144250
or 1296100 or 10368115, for example. If you are using
PackRatFinder with N1MM and are using CAT control of your radio
with N1MM, then when you click on the spotted frequency in
PackRatFinder it will tune your radio to that frequency. 1.6 [4] When
the mouse hovers over a particular station's cell for a
band, a pop-up "tool tip" will show the date and time of the
contact made with that station on that band if the station
has been worked on that band. If the station has not been
worked on that band, then the tool tip will say "Need" or
"No Band" depending on whether that station has that band
available or not. 1.7 [5] The
program is interfaced with N1MM+ so that when a contact is
logged in N1MM+, the cell for that station and band
combination will change from red to white. If that
contact is later deleted in N1MM+ (because it was logged in
error), the cell will change back from white to red.
Similarly, if because of a logging error the band used is
changed in N1MM+ by editing the contact, that change will
also be reflected by the PackRatFinder display. As was noted
above, the N1MM+ interface also results in automatic
self-spotting to other PackRats using Pack Rat Finder. 1.8 [6] The
program will generate both a display and a text file report
that shows each band worked for each PackRat and lists the
time and date of each such contact. The report also
shows the total points made [exclusive of multiplier] for
contacts with each PackRat, and the total possible number of
points that could have been made by contacting that PackRat
on every mutually available band. 1.9 [7] The
main display also shows, in the fourth column, the number of
points that are still to be obtained by contacting that
PackRat on all mutually available bands for which contacts
have not yet been logged. 1.10 [8] As
noted above if one is not running N1MM+, the program can
still be used in "manual" mode, by left clicking on a red
cell to "log" a contact or right clicking on a white cell to
delete a "logged" contact. The operation of this
program has no effect on the N1MM+ log /
database. PackRatFinder NEVER writes to or
alters in any way the N1MM+ databases. So there is no chance
of corrupting your N1MM+ logs or databases by using
PackRatFinder. Without N1MM+ you can still see frequency
spots from other stations, and you can manually spot your
frequencies as well. But you lose the ability to have
your display automatically updated each time you log a
contact, you lose the ability to have your frequency
continuously automatically spotted, and you lose the ability
to easily send your radio to the frequency of any PackRat
spotted by PackRatFinder. As will be noted below,
without N1MM you also lose the ability to easily rotate your
antennas to point at a given PackRat just by clicking on his
azimuth value in PackRatFinder. 1.12 PackRatFinder
works by parsing the data from the K1RZ/W3SZ Database-generated "PackRatsToLookForFromWebDatabase.txt"
(or any other text file with similar format) in order to
create a display grid with a row for each PackRat call sign
contained in that list. In the display each Pack Rat (or
each Pack Rat-Grid combination for Rovers) has a row with 19
separate columns (or cells). These individual cells contain
that station's data for (1) Call sign, (2) Grid Square, (3)
the Azimuth (heading) from your station to that station, (4)
the maximum number of points that can be obtained
[neglecting multiplier] if the station is worked on all
bands available that have not yet been worked, (5) N1MM+'s
current Radio 1 Frequency (or the station's self-spotted
frequency), (6) N1MM+'s current Radio 2 Frequency (or the
station's self-spotted secondary frequency), then (7) - (18)
a column (cell) for each band from 50 MHz through 24 GHz
plus light that will be colored RED if the station has not
been worked on an available band, WHITE if the station has
been worked, and BLACK if the station does not have that
band capability, and finally (19) a column for telephone
number and other miscellaneous information. The app can be
used either stand-alone or with N1MM+ to keep track of which
PackRats you still need to work, and on what bands, and on
what frequencies you can expect to find those Pack Rats at
the current time, based on their self spotting information
generated by PackRatFinder at their station. 1.13 As noted
above, each time a station is logged on a band on N1MM+, the
cell for that station on that band is automatically changed
from RED to WHITE. Thus, one can follow one's progress
during the contest. The illustrations at the top of the page
demonstrate this. If you "run the
bands" with a station his row of cells for available bands
will turn from completely red to completely white and his
point total will show zero, as you have obtained all of
the points possible from that station. For
example, if a station has all bands 50 MHz through 24 GHz
plus light, as does K1DS/R, at the start of the contest his
displayed point total will be 62. After working him on
all bands except light his displayed point total will be 8.
And if he is worked on light as well his displayed
point total will be zero. 1.14 As also noted
above, if you are not using N1MM+, you can still use this
app to keep track of the PackRats/bands that you have
worked. Left-clicking on a Red cell will change it from Red
to White, indicating that you have worked this station on
this band. So you can mark off the Pack Rats/bands that you
have worked in this fashion and watch the grid turn from
mostly red to mostly white as you work fellow Pack Rats on
more and more bands. If you made a mistake in
clicking, you can undo your mistake: clicking on a red cell
will turn it white, and clicking on a white cell will turn
it red. Anytime you make a change like this, it is
immediately saved to disk. 1.15 Also, if it turns out that a PackRat
has a band available that wasn't in the list, you can
left-click on the cell for that PackRat/band combination and
it will turn the cell from Black to Red. If you click it
again, it will turn it white. If you need to turn a cell
black because it turns out that the station doesn't have
that band available, or because you mistakenly clicked a
black cell, double-clicking a red or white cell will turn it
black. As you click the cells as just described,
PackRatFinder corrects the displayed point totals for that
station. 1.16 The
information below tells you what you need to do to get
things set up and gives you some more details of operation.
2.1
The first time that you start the program Windows may
ask you if you want to run this program that is "from an unknown
source", which is me. Answer "yes". Also, the first time that
you run this program Windows will ask you if the program may use
the Internet by presenting you with a Window that looks like
this:
This occurs for two reasons: [1] because PackRatFinder uses UDP
packets to communicate with N1MM+ running on the same computer,
and [2] because the program communicates with a web-page on one
of my servers to send and receive the N1MM+ frequency "spot"
information that is displayed in columns 5 and 6 of the grid
display, as outlined above. 2.2
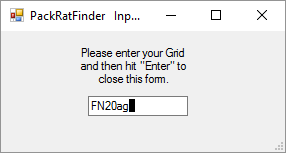
When you start the program for the first time, the
program will present you with a window where you must type your
call sign and then hit the "Enter" key before you can
proceed further. This window looks like this:
2.4
[1] If you click on the "Update Pack Rats File" button and if you are connected to the internet, PackRatFinder will
download the latest version of the PackRatsToLookFor file and when you close the Setup Form it will begin using this new file.
If the file is successfully downloaded, then PackRatFinder will show you a message box indicating that the file has been successfully downloaded.
If the file cannot be downloaded, PackRatFinder will keep trying to download the file for 10 seconds and then show you a message box indicating
that it was unable to download the file. In either case, you need to click to close the message box before you can continue.
2.5
Once this button and text box have appeared, you can then select
the location [Directory and File Name] of the Pack Rats To Look
For file by clicking on this "Select PackRats File
Name/Location" button. If you have been using a
non-standard Pack Rats To Look For file and want to return to
the default file that is supplied with the program , just
uncheck the just-mentioned checkbox. You don't need to
select the default file manually; the computer will do the rest.
2.6
If you need to change your call, enter your call sign
in the text box labeled "My Call". If you are a fixed station, then just enter your call. If you are a rover then enter your call with an appended "/R"
as, for example, NN3Q/R. 2.7
Make sure the "Using SO2R" box is checked or not
checked as is appropriate for your SO2R status. Then
select the bands which you have available by checking the
appropriate boxes at this point. Columns for bands that
you haven't checked/don't have available will not appear on the
display. 2.8
If you want to select a non-standard file or file
location for the N1MM+ database (i.e., any database other
than the last one used by N1MM+), then check the checkbox
labeled "Use Non-Standard N1MM File Location" and a new
button labeled "Select Non-Standard N1MM File
Name/Location" will appear, as well as a text box
containing the name of the N1MM Database file currently
being used by PackRatFinder. Select the N1MM+
Database location and filename by clicking the "Select
N1MM+ File Name/Location" button and left-clicking your
preferred database file and then clicking "Open". If you are using an N1MM database located on another computer, then you need to [1] "Share" that drive
across the network with no need for password access and [2] set that remote drive up as a mapped drive on the computer running PackRatFinder, and set the
mapped drive to "reconnect at sign on".
2.9
When
you have selected SO2R operation with non-standard files and
file locations chosen for both the Pack Rats To Look For file
and the N1MM database file the setup form looks like this: 2.11
2.14 When you close
the Setup Form, it will reset the operating state of
PackRatFinder so that any changes you made in Setup are
recognized. It will return the PackRatFinder form to
full size, remove any size lock, and reload the Pack Rats
To Look For list and the N1MM+ database. 2.16 Once you have
entered all of this information, PackRatFinder and N1MM+
will remember all that you have done, so you don't need to
enter any of this information again unless you want to
change any of the parameters. The next time you start
the PackRatFinder all of this information will already be
there so to get started you can just click on either "Get
N1MM Log" if you are using N1MM+ or "Use Modified" if you
are not using N1MM+ and if you want to recall PackRat QSO
data from a prior session. 2.16 You are
now done with the Setup process. Close PackRatFinder and restart it before proceeding further. 3.
Basics of Using PackRatFinder: 3.1
Below is a closeup of the very top of the main screen as it would appear
for a fixed, non-rover station using manual frequency spotting after doing what I have just
outlined above: 3.2
At present there are 6 control buttons at the top of the
program window. The first button on the right is the
button labeled "Setup", which brings up the Setup Window as
described above. It is very possible that you will never
need to use this button. Just to the left of the Setup
button are the "RatList" and "N1MM" buttons. The
"RatList" button is used when you restart the PackRatFinder if
you are NOT using N1MM+, in order to bring up the prior state
of the band display and reload your QSO status. It is
only meant to be used once during a program session.
This button would be used for example on Sunday morning
if you are NOT using N1MM+ and if you had shut everything down
Saturday night, so that you needed to load all of the contacts
that you had made Saturday back into the PackRatFinder so that
on Sunday morning you could pick up where you left off
Saturday night. 3.3 The "N1MM"
button is used instead of the "RatList" button when you are
using the program with N1MM+. It loads the N1MM+ Database
that was selected in the Setup Window into PackRatFinder and it
thus sets the PackRatFinder display to reflect the PackRats
contacts included in that database. If you are using this
button, then you need to make sure that you are using a separate
N1MM+ Database for each contest, because every contact in the
database [that has not been marked as a deletion within N1MM] is
loaded into the app unless you entered the correct Contest
Number when you completed the Setup screen.
3.4 Because the
"RatList" button is supposed to be used only once at the start of
a session, it disappears after it is used. And because it is an
alternative to the "N1MM" button, it disappears if the "N1MM"
button has been used. Unlike the "RatList" button, the "N1MM"
button does not disappear after it is used and it can be used to
reload the "PackRats To Look For" file and the N1MM+ database into
PackRatFinder if you've made a mess of things and want to return
the state of the display to that given by the "PackRats To Look
For" file and the N1MM+ log.
3.5 Note that if
you delete or edit a contact in N1MM+, this change will be
reflected in the PackRats Finder display within a second or two,
and the cell representing that contact will revert to its
appropriate color, but changes that you make in PackRatFinder by
directly clicking on its display have no effect on N1MM+. So you
cannot damage or corrupt your N1MM+ database from
PackRatFinder.
3.8
The top image above shows the top of the main screen during operation for a station using manual frequency spotting.
The bottom image shows the top of the main screen during operation for a station using N1MM frequency control.
In both cases, just to the right of the "Search" button is a text box that
will display your call sign. Your call sign will appear
here only if your spot information has been received by the
internet spot server. Below the call sign text box
is the text box that displays your grid. If you need to
change this, as if for example you are a rover changing grids,
then click in the usual way to delete the current entry and
replace it with your new grid and then ht the "Enter"
key. The program will not accept an invalid grid.
Between these two text boxes and the "N1MM" button is the
Manual Spot Entry group of controls as is shown above. In the
Manual Spot group of controls there are two text entry
windows, for entering manual spot frequencies for up to two
radios. To enter a frequency you type in the digits in kHz
such as "144200" or "902100" and then hit "Enter". When
entering spots manually you should use whole integers for the
frequency rather than decimal fractions. When you are entering
the digits, they will initially be black on a white background. After you hit enter, if the frequencies
are successfully received by the web server, the background
color of the text entry window will change to light-green if
that radio has focus, and to white if that radio does not have
focus. This is shown on the top illustration above. When using manual frequency spotting, a
radio (frequency) is given focus by clicking the radio button
next to its text entry window. Clicking the checkbox
labeled "Snd" will enable the periodic sending of manually-entered
spots to the webserver if N1MM+ is not running and has not
been running during the current PackRatFinder session. It
should be checked before you start to enter manual
spots. If you are operating SO1R or if you are a rover
not running SO2R then you should use only the left manual
frequency entry box. Note that if N1MM+ is
running or has been running earlier in the current
PackRatFinder session then you must close N1MM+ and also
close and then restart PackRatFinder before you can upload
any MANUALLY spotted frequencies. PackRatFinder is
designed in this way, to always give preference to
N1MM+-created spots, because those spots are far superior in
terms of accuracy and timeliness to manually entered spots.
Below the control buttons and the manual frequency-entry boxes are 4 text display boxes, which
display information about your station retrieved from the
webserver, to verify that your spots are being handled
correctly. First, immediately below the two manual frequency entry text
boxes just discussed you can see two frequency boxes. If you
are using two radios, whether you are using manual or N1MM frequency spotting, then both of these boxes will have frequencies listed
in them. If you are just using one radio, then only the left
box will be used. These two boxes show your frequency
spots as received back from the webserver. The two small boxes
on the right and left sides of these frequency boxes show the
number of minutes that have elapsed since your station last posted a self-spot
to the webserver, whether that spot was done manually or by N1MM. The "Lock" check
box will be discussed below in section 7, "Special
Features: ToolTips and Hovering, Point Scores, How
Rovers are Displayed, Resizing".
3.10 In the image above, just to the right of the Status Dropdown menu you can see a checkbox labeled "Recent". If you check this box, then only those database entries with Start Times later than the date you selected in the DatePicker on the Setup page will be shown in PackRatFinder. This reduces the "clutter" produced by stations who are not active for the current contest, at the expense of potentially hiding the entries of stations who are active in the current contest but who forgot to update their Start Times for their database entry. The image on the left shows the Setup Window, with the DatePicker shown in the process of selecting the date on which this entry was written. Checking and un-checking the "Recent" box on the main window will toggle back and forth between the two states, "all stations" and "only recent stations".
3.11 Just above the "Recent" checkbox in the top right corner of the main window is the "Xclude" checkbox. When this checkbox is checked, then entries for those callsigns included in the Exclude List will not be shown on the main display. This checkbox is useful when a station operating outside your capture area, particularly a rover operating from multiple grids, is cluttering up your display with grid entries that you are not likely to work. You can enter such a call into the Exclude List on the Setup Page by typing it in the textbox labeled "Type Callsign to Add or Remove", as seen on the right, and then when you subsequently click the "Add" button you will add that call to the Exclude List and therefore hide all entries containing that callsign as long as the "Xclude" box is checked. If you uncheck the Xclude box, then all hidden-callsign entries will be immediately displayed. If you want to remove a callsign from the Exclude List (but still hide the other calls contained in the Exclude List), just go to the setup page and click that call in the Exclude List List box and then click the "Remove" button and that call will be removed from the Exclude List and thus will not be hidden whether or not the Xclude box is checked.
4.
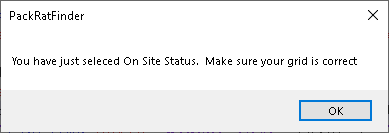
Using PackRatFinder For Rovers: Additional Features 4.1
If you are a rover and you change from one of the other three rover status types to "Rover OnSite", then you will get a popup reminding you to change your grid as you can see below. : 4.2
As was noted above, PackRatFinder sends out your station status (as well as your frequency status and location) every time that you change it, and periodically thereafter.
When your rover status is "On Site", then your callsign cell background for the grid that you are currently in will be colored red. When you are traveling, it will be light green.
When you are on site but on break it will be coral. When you have indicated that you have a problem it will be blue. The same colors will be shown for your marker on the map extension
to the K1RZ/W3SZ Database, except that for "On Site/On Break" status your marker will be colored dark brown instead of coral, because I wanted all map marker colors for rovers to be different
from all map marker colors for fixed stations. In PackRatFinder, the callsign background for a "live" rover's grids that are not their current grid will be colored yellow. All stations, both rover and fixed, that are not live via either PackRatfinder or the map extension to the K1RZ/W3SZ Database will have white backgrounds. 4.3
When the rover is preparing to leave his/her current grid
location, he should change his/her status to "Rover Traveling".
This will alerting the other stations
that the rover is no longer available for contacts at
his/her current grid. 5.
Frequency
Spotting: 5.1
The "spotting" ability of PackRatFinder is an EXTREMELY
useful part of this program that should give a major boost to
Pack Rat individual and Club scores if a sufficient number of
Pack Rats adopts its use. One of the major problems for
PackRats, which I hear complaints about after every contest,
is that many Pack Rat to Pack Rat contacts never get made
because, although both Pack Rats were operating the contest,
they never "found each other" on the air. With PackRatFinder
you can see the current operating frequency of any Pack Rat
who is using PackRatFinder and N1MM+ or is using PackRatFinder
and manually entering his spot frequencies as described above.
This is HUGE! The more Pack Rats who use PackRatFinder with
N1MM+ (or use PackRatFinder and manually spot their
frequencies) the more this feature will increase both our CLUB
score and our individual scores. Also, whether or not you use
N1MM+ you can see the frequency data for other Pack Rats who
use PackRatFinder and have their frequencies spotted by
PackRatFinder as described above. 6. Sending
Frequency and Azimuth Information From PRF to
N1MM+ 6.1
If you are using PackRatFinder with N1MM+, then
PackRatFinder will send the spotted frequency for any station
shown on the PackRatFinder display to N1MM+, and if you have
set up CAT control in N1MM+ this will then place your radio on
that frequency. So if you see, for example, that K2TXB
is on 222111 as is shown above and you left-click on 222111,
PackRatFinder will put your radio on 222111 so you can call
Russ. If you click the frequency 2304101 in the
second-radio box for K3HUW above, it will put your radio on
that frequency. You can choose which frequencies go to
which radio of yours by assigning each band to either Radio 1
or Radio 2 in Setup, as was described above in the Setup
section. 6.2
PackRatFinder uses your and the other station's grid
locators to calculate the azimuth (heading) from your station
to the other station, and these values are shown in the third
column of the display. If you left-click on the azimuth
value for a particular station, PackRatFinder will send that
azimuth value to the rotor named in the PackRatFinder SetupForm "N1MM Rotor Name" textbox via the N1MM+ Rotor Control app and the specified rotator will
rotate to that azimuth. If you left-click on the azimuth
value for a particular station while holding down the Control key, PackRatFinder will send that
azimuth value to the rotor named in the PackRatFinder SetupForm "Ctrl-N1MM Rotor Name" textbox via the N1MM+ Rotor Control app and the specified rotator will
rotate to that azimuth.
Note that the names typed into the text box[es] here must be IDENTICAL to the names as specified in the N1MM Rotor program "Setup Rotors >> Rotor Setup" form.
If you only have one rotor, ignore the N1MM Ctrl-Rotor Name textbox. All of this is explained and also illustrated in section 2.9 above. 6.3
So if you see a station in PackRatFinder that you want
to work, you just need to left-click on the frequency and the
azimuth values for that station as displayed in PackRatFinder,
and your radio will be placed on frequency and your array
rotated to point at that station so all you have to do is
activate the PTT and call the station. 6.4 Map Extension:
You can also rotate your arrays from the Map Extension to the K1RZ/W3SZ
Database, via PackRatFinder: 7. Special Features: Tool
Tips and Hovering, Points Scores, How Rovers are
Displayed: 7.1
A question that seems to arise several times between me
and other PackRats every contest is "Did we work each
other or not and if so when?" on a particular band or set of
bands. Looking at the red, white, and black colored
portion of the display you can answer the first part of this
question immediately. I've tried to make answering the second
part of question easier by including in the display the time
of each QSO, as logged in N1MM+ or as determined by when you
"clicked red to white" if you are using the app manually
without N1MM. If you hover your
mouse over a white cell you will see the UTC date and time
of the contact. If you hover over a black cell you
will see "No band" and if you hover over a red cell you will
see "Needed". Below is a screen shot demonstrating this
feature that I obtained by hovering over the 144 MHz cell for
FM29 for NN3Q/R. Reading the tool tip, you can see that
I worked NN3Q/R on 144 MHz in FM29 at 11:56 PM UTC on
1/30/2016. This of course agrees exactly with the N1MM+
log: 7.2 In fact, you can hover over any cell
and see its contents, with four exceptions. The
first exception is that if you hover over a station's
call, the tool tip will display the "Comments" section of
the PRF display for that station. You can see this
in the image shown in Section 9, where I hovered over
VE3OIL/R's call and his comments were therefore displayed
in the tool tip visualized there. The second
exception is for the two frequency cells; when you
hover over one of them, the tool-tip gives you the number
of minutes since that station's frequency was last
"spotted" by Pack Rat Finder. The third exception is
that if you hover over a station's grid square, the
tool-tip displays the distance in km to that station.
The fourth exception is that if you hover over the
azimuth value for a station the tool-tip will give you the
reverse azimuth (reverse heading) for that station.
7.4
Rovers need to be treated in PackRatFinder like a
separate station for each grid they activate, because
that is how the ARRL Contest scoring system treats them.
So I have modified the "PackRats To Look For" file
to provide the best support for Rover contacts by doing
just this. In this file, each Rover call has a
separate line (row) for each grid, and the Rover call
listed in column one of the display is a concatenation
of the call sign plus "@" plus the grid. So K1DS/R
would be listed for FM29 as K1DS/R@FM29. This
concatenated call sign applies ONLY to the "PackRats To
Look For" file and the display on this app. You
still log the stations in N1MM+ using their normal
callsigns (with the "/R" Rover designation for all
Rovers). 7.5
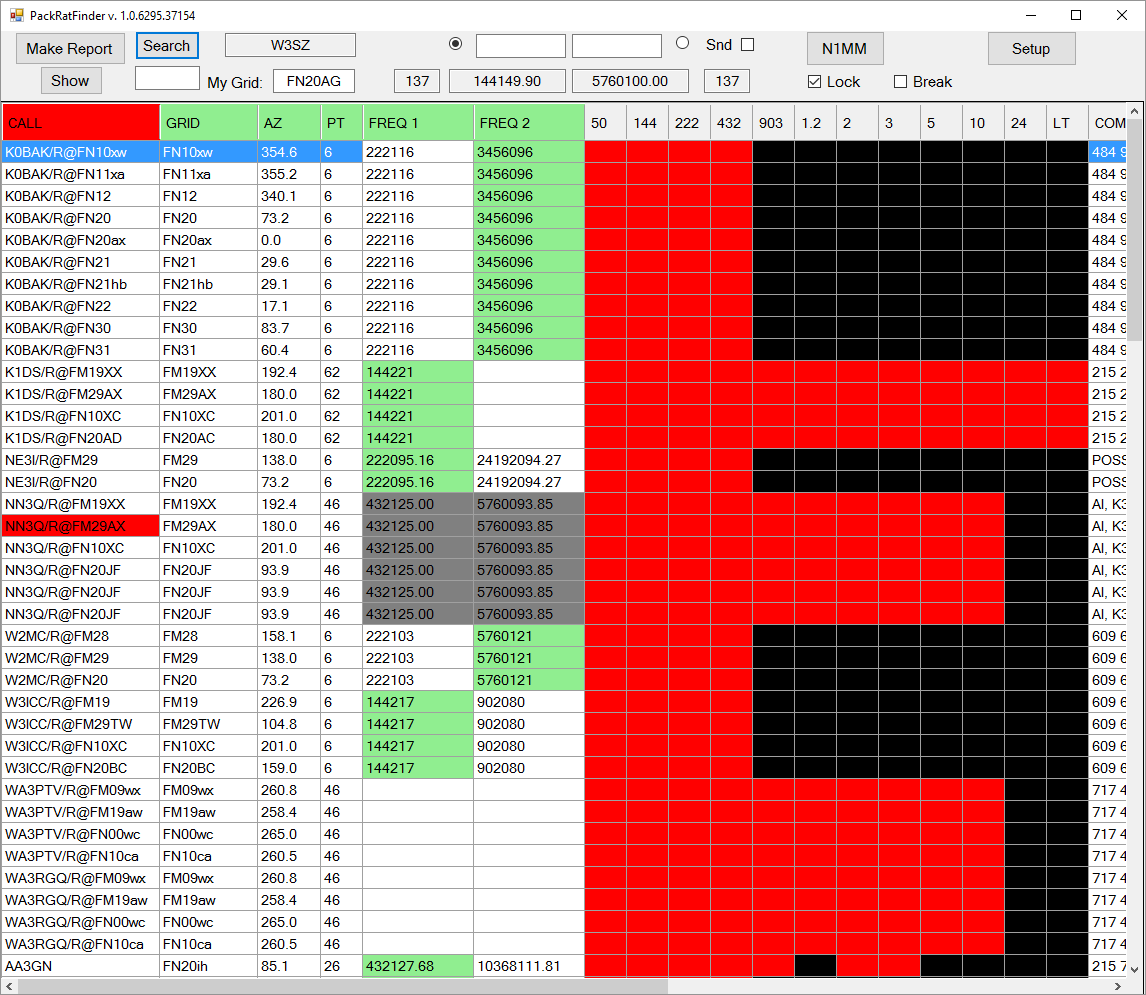
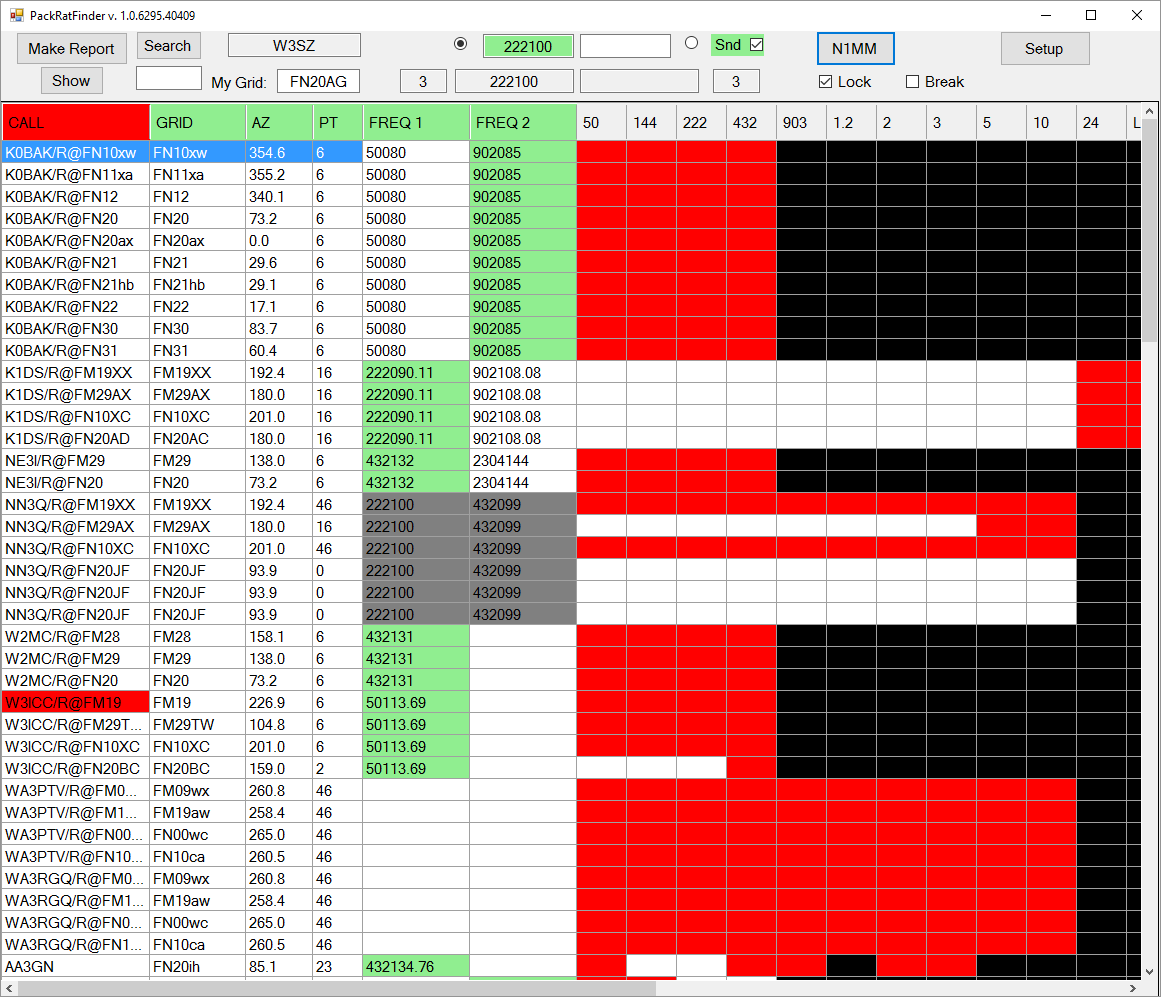
You can see how important Rovers are to our Club effort
by comparing the PackRatFinder display (of my log) for some of
our Rovers at the start of the January Contest on the left and
at the end of the contest on the right: 7.6 If you click on any non-empty cell in
any of the first 6 columns or on the comments cell, then
all of the cells in those columns that are not empty will
be highlighted with a blue background and white text, as
is shown below where VE2NCG/R@FN35el's row is highlighted: 7.7 When you log
a station in N1MM, or edit a log entry in N1MM, then
PackRatFinder will move its display to show you the line
in your PackRatFinderDisplay that is associated with that
station so that you don't need to manually scroll the PRF
display to locate that station. 7.8 A common
request after the first widespread use of PRF in a contest
was for a display with variable sizing of the fonts,
cells, and controls. So PRF now has a wide range of
possible sizes for these items. In the image below
you can see a PRF display with the smallest permitted
sizing superimposed on one with the largest permitted
sizing of these elements:
7.14 A Version Number is now shown on the PRF display near
the upper left corner. This will be helpful if you are
wondering if you have the most recent version or if you are
reporting bugs. 8.1 One potential
pitfall of the "real-time" spotting in PackRatFinder is that if
the operator is away from the station taking a break but he/she
has left PRF running, it will keep spotting in spite of his
absence, and prior to the addition of the "Give me a
Break" feature to PRF, those monitoring PRF would have no idea
that the station operator was on hiatus, and they could waste
valuable time calling someone who was not at the radio.
With recent versions of PRF, the operator should user the status dropdown in the upper right portion of the PRF
display, below the "Setup" button,, to set his/her status to "On Break" when taking a break. After he has done
that and after his "break" signal has been received by the
server, his call sign window at the top left of the display will
begin to flash alternating between blue and yellow and instead
of displaying his call, it will display "On Break", in order to alert him that PackRatFinder is set to "On Break" status
so that he remembers to change it when he again begins operating. The image below shows the status dropdown containg the "On Break" and
other status choices.
8.2 Activating this "On Break" function causes the station who
is on break's call sign field to have a coral background on
everyone else's PackRatFinder displays, and either a coral or a dark brown background on the map extension to the K1RZ/W3SZ database, depending on whether
the station is a rover or fixed. Thus, even if the
spots are being updated for this station, all other operators will
know that he is on break. When the station returns from
break and uses the status dropdown to reset his status, his call sign will return
to his display (and the On Break annunciator will thus disappear)
and his call sign background on everyone else's displays will
change to the appropriate color for his newly selected non-break status.
Below is an image showing that W3HMS is On Break, WA3GFZ and WA3JZN are Live and not on break, and the remaining stations are not currently "live", meaning that they are not currently running
either PackRatFinder or the map extension to the K1RZ/W3SZ Database:
9.1
Pack Rats vs Non-Pack Rats, and "Up to Date" vs "Not Up to Date" stations are differentiated by the first character of their entry line in the "PackRatsToLookFor file, which is
automatically generated by the K1RZ/W3SZ Online Database.
PackRatFinder reads these special characters and uses them to color-code each station's entry so that a quick glance at PackRatFinder will show [1] whether the station is a Pack Rat or not, and [2] whether the station
has recently updated its data in the K1RZ/W3SZ Online Database or not. This is shown in the image below. 9.2
In addition to color coding them the program also places non-Packrats at the bottom
of the display, after all of the PackRat stations. Within the non-PackRat
group of stations, the sorting will be the same as for PackRat stations,
alphabetically by call, or by grid, or by points. Here is an example of
how the display looks when populated with up-to-date and not-up-to-date Pack Rat and non-Pack Rat
stations. Color coding is as defined above: 10.
Downloads
10.1
The latest version of the program is 1.0.8049.31882. In the "Programs and Features" portion of the Windows Control Panel, the version is listed as 1.0.0.116. Please let me know of any suggestions or problems. I have
only tested this on Windows 10 and Windows 7. After you download the
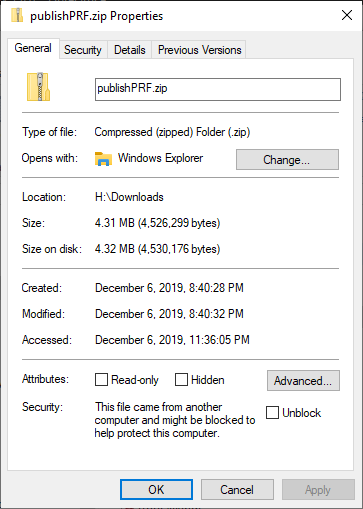
zip file for this program by clicking here, right click the publishPRF.zip file that you downloaded and then click on "Properties" and you should see a window similar to the one shown below. Then then left click the checkbox labeled "Unblock", so that it is checked. Then click OK.
10.2
You can download the most recent PackRats To Look For file here.
11.
INFORMATION FOR THE ADVANCED USER: 11.1
You can easily add any call that you want to the "Pack Rats To Look For" file so that
that station appears in the PackRatFinder display. Just add
a line to the end of the file for each station that you want
to add using the following format:
or
if no phone number: #CALL
GRID BANDS (Comments) Bands
are in the format: 6-2-222-432-903-1.3-2.3-3.4-5.7-10.3-24-L
Note
that there is a single space before the leading "#" character. There
is no space between the # and the call, but there must be spaces between
each of CALL, GRID, BANDS, PHONENUMBER, COMMENTS. Example: #W2SZ
FN31jp 6-2-222-432-903-1.3-2.3-3.4-5.7-10.3-24 (xxx-xxx-xxxx) PR Chat Room:NO 11.2
Stations added in this manner will appear alphabetically at the bottom of the
list after the last Pack Rat listed, and their grids will be highlighted in
yellow to emphasize that they are not Pack Rats. 11.3
If you want the station you are adding to be mixed in with the
Pack Rats and not identified with the yellow highlighting (i.e., listed in
exactly the same way as Pack Rats members), then instead of using the initial
character "#", use the initial character "-" (hyphen, NOT underscore). 11.4
Think of this file as being like a CALL3.TXT file. Everyone can create his/her own
preferred file. If the file has too many calls, it loses its utility. Only you can make
your file ideal for you! The program only reads the file at startup or after you have used the
Setup form, so you need to click on "Setup" to open the Setup form and then close it, or stop and restart
PRF for PRF to see the modifications you've made to the PackRats To Look For file if PRF was running when
you made them. Copyright
1997-2017
COPYRIGHT
Roger Rehr
W3SZ. All
Rights
Reserved.
1. Shows a list of all active PackRats with information on:
2.
Provides the following operating conveniences if you are connected
with N1MM:
3. Additional features:
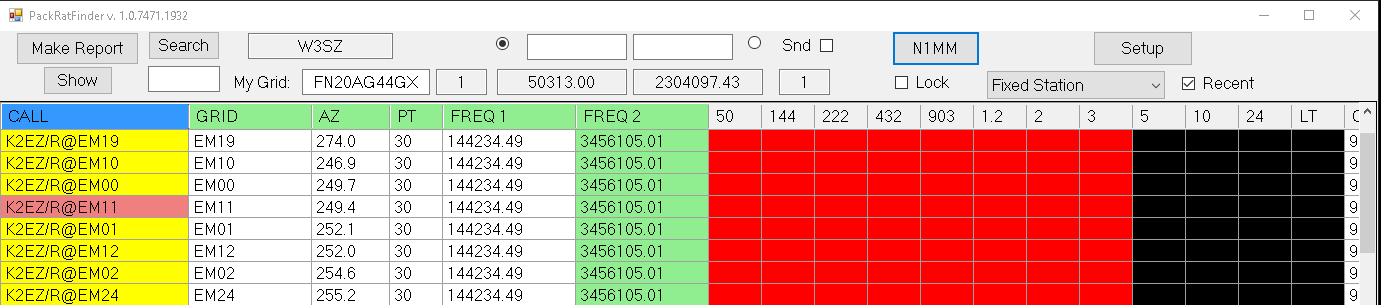
1.11 [9] When a rover indicates
that he is on site and ready to operate, the background of
his call sign cell on the data grid for his current grid
(the first column of the display) will change to red. When he indicates that he is moving off site or taking a break his
call sign cell
background will change from red to green if he is "traveling", cyan if he has a problem, or coral if he is taking a break.
In the image above you can see that K0BAK/R is traveling
in FM19xx, and K1DS/R is on site in FN20IG. This feature, especially when coupled with
the frequency spotting feature, provides a powerful tool to
ensure the completion of the maximum number of rover
contacts possible. The program can be used by the rover to
operate in either single radio or SO2R mmode with either manual spots
or N1MM+-generated spots.


After you have typed your call sign and hit the key,
you need to type your grid into the next window's textbox and then
hit "Enter":
Once you've done that, a third window will appear where you select
your bands of operation:

When this window appears it is set for SO1R operation, as is shown
above. If you want to operate SO2R, then you need to check
the box "Using SO2R". When you do that the appearance of the
window will change to this:

Check the boxes for the bands that you are going to use, and if
you are using SO2R assign each band to the appropriate radio.
Once you have done this, close the Band Input form by clicking the
"X" at the upper right corner of the form. A message box will then pop up
asking you if you want to update the PackRatsToLookFor file. In general you should
click "Yes". PackRatFinder will then attempt to download the file from the internet and
either show you a message box indicating success, or a message box indicating failure. You
must click to close this message box; then the
PackRatFinder application will pop up, ready for use.
Unless you are using a non-standard PackRatsToLookFor file location (see below), PackRatFinder will ask you if you want to update the PackRatsToLookFor file each time
you start the program, and in general you should click "Yes".
2.3 The Setup Form looks like this when you
first bring it up by clicking on the "Setup" button at
the top right of the main app window:

[2] To change to a non-standard Pack Rats To Look For file name
or file location, first check the checkbox labeled "Use
Non-Standard PackRats File Location". This will cause the
setup form to display a button labeled "Select PackRats File
Name/Location" beneath the "Use Non-Standard PackRats File
Location" check box, and to display beneath that button a text
box showing the currently selected Pack Rats To Look For file
name, as shown below:
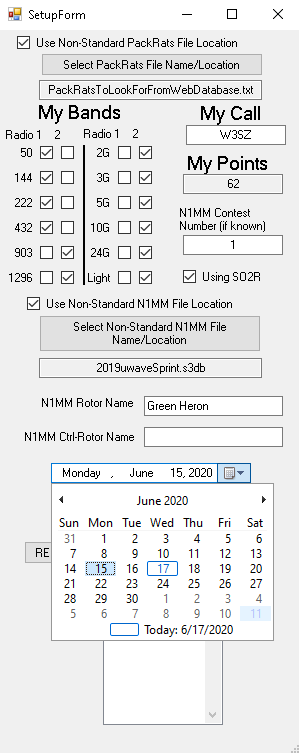
 Near the middle of the SetupForm are text boxes for entering up to 2 rotor names. This feature is designed for use with the N1MM Rotor program. When the Azimuth "AZ" grid for a station is left-clicked,
PackRatFinder will send the azimuth value displayed in that grid to the rotor that is assigned in the N1MM Rotor program to the name that is typed into the "N1MM Rotor Name" textbox on the PackRatFinder SetupForm, as shown above. In this example,
that name is "Lower Azimuth". When the Azimuth "AZ" grid for a station is left-clicked while the Control key is being held down,
PackRatFinder will send the azimuth value displayed in that grid to the rotor that is assigned in the N1MM Rotor program to the name that is typed into the "N1MM Ctrl-Rotor Name" textbox. In this example,
that name is "Micro Azimuth". Here at W3SZ, the "Micro Azimuth" rotor rotates the arrays for 902 MHz though 24 GHz, and the "Lower Azimuth" rotor rotates the arrays for 50-432 MHz. Note that the names typed into the
text box[es] here must be IDENTICAL to the names as specified in the N1MM Rotor program "Setup Rotors >> Rotor Setup" form. If you only have one rotor, ignore the N1MM Ctrl-Rotor Name textbox.
2.10 Below the rotor text boxes you can see a Date Picker box and some buttons, a text box, and a list box. These are discussed in sections 3.10 and 3.11 below.
Near the middle of the SetupForm are text boxes for entering up to 2 rotor names. This feature is designed for use with the N1MM Rotor program. When the Azimuth "AZ" grid for a station is left-clicked,
PackRatFinder will send the azimuth value displayed in that grid to the rotor that is assigned in the N1MM Rotor program to the name that is typed into the "N1MM Rotor Name" textbox on the PackRatFinder SetupForm, as shown above. In this example,
that name is "Lower Azimuth". When the Azimuth "AZ" grid for a station is left-clicked while the Control key is being held down,
PackRatFinder will send the azimuth value displayed in that grid to the rotor that is assigned in the N1MM Rotor program to the name that is typed into the "N1MM Ctrl-Rotor Name" textbox. In this example,
that name is "Micro Azimuth". Here at W3SZ, the "Micro Azimuth" rotor rotates the arrays for 902 MHz though 24 GHz, and the "Lower Azimuth" rotor rotates the arrays for 50-432 MHz. Note that the names typed into the
text box[es] here must be IDENTICAL to the names as specified in the N1MM Rotor program "Setup Rotors >> Rotor Setup" form. If you only have one rotor, ignore the N1MM Ctrl-Rotor Name textbox.
2.10 Below the rotor text boxes you can see a Date Picker box and some buttons, a text box, and a list box. These are discussed in sections 3.10 and 3.11 below.
=====>
You can avoid the hassle I am about to describe below if you
use a separate N1MM+ database for each contest, something that
experienced contesters do to reduce the chances of
catastrophic data loss. If you do that, you can just
enter zero into the text box labeled "N1MM+ Contest Number (if
known)" and PackRatFinder will input only those contacts from
the contest you are operating, which is exactly what you want
it to do. Note that the N1MM+ developers strongly recommend
that all users start a new database for each contest, so if
you do this, you are doing what is recommended by N1MM+'s
developers.
<=====
2.12 If you don't use the default N1MM database file
then you need to enter the positive integer number that
N1MM+ assigned to the contest you are logging into the text box
labeled "N1MM+ Contest Number (if known)". If you don't
know this number, enter zero. In that case PackRatFinder
will consider every contact in the database to be a contact in
the current contest.
2.13 If you didn't follow the advice given above and
therefore need to know the contest number, you can determine the
contest number from within N1MM+ by opening File>>Open Log
in Database <database name> and then counting from the
bottom of the "Select Existing Log" window starting with the
integer 1 for the first contest listed above the entry "DX", the
integer 2 for the contest listed above that contest, etc.
Or, if you have a program for using SQLite databases, you
can just use that to see the value of the "Contest NR" field
(Field 27 or 28 depending upon whether your indexing is
zero-based or 1-based) for the contest you are logging.
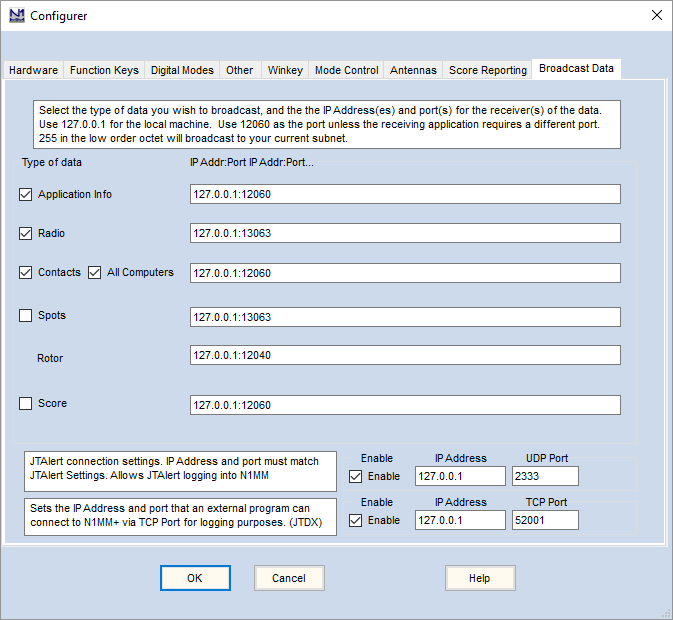
2.15 After you
have finished with and have closed the Setup Form, start
N1MM+ and in N1MM+ go to "Config>>Configure Ports,
Mode Control, Audio, Other...>>Broadcast Data" and
put a checkmark in the box in front of "Application Info"
by left-clicking on it, and in also put a checkmark in the
boxes in front of "Radio" and "Contact" by
left-clicking on them as well. Also make sure that the
address for "Radio" shown under "IP Addr:PortIP
Addr:Port.." is 127.0.0.1:13063 and that the addresses for
"Application Info" and for "Contact" are both
127.0.0.1:12060. Then click "OK". Your Configurer
Window in N1MM+ should look like this:

3.6
On the left side of the main window are
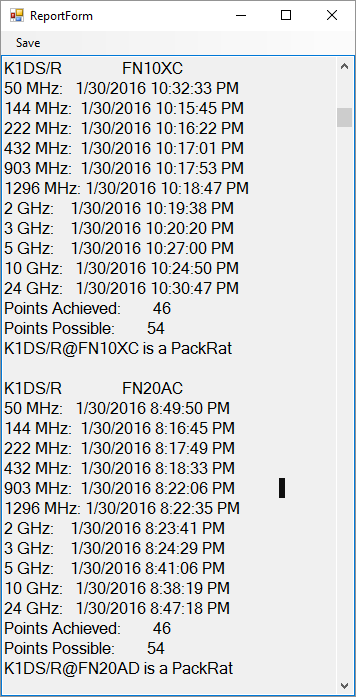
three more buttons, labeled "Make
Report", "Show", and "Search". "Make Report" writes a
report to disk of all Pack Rats/bands worked, putting it
into the same folder as the program, but does not
display the report. "Show" writes the report to disk and
also opens up a display window showing the report. This
report is a text file named "PackRatsWorked.log". An
example of the display window that you see if you click
"Show" is shown on the right. The window is scrollable
and its size can be adjusted by pulling on its edges.
If you are a rover and you click "Make Report" or
"Show" after you have completed your contacts in each
grid, PackRatFinder will save to disk a report for each
grid and identify those reports by grid. For
example if you are in FN20ag , it will name the report
for that grid "FN20agPackRatsWorked.log". If you
want to save a report with a name other than the default
name, just click on the "Save" button on the report form
and you can save the report with a different name than
the default.
3.7 The "Search" button allows you to search in
the displayed data grid for a call sign. Type the
call sign into the box below the "Search" button and
click the "Search" button and the data grid will scroll to that call
sign, placing it at the top of the list.


3.9 The image above shows the "Status" dropdown selection box, which is activated by clicking on the arrow near its right edge. This control is used to set the "Status" of your
station as it is displayed to other users of PackRatFinder and the map extension to the K1RZ/W3SZ Database. There are 6 choices, two for fixed stations and four for rovers.
For fixed stations, the choices are either "Fixed Station" or "Fixed / OnBreak". If you select the choice "Fixed Station" then for other users of PackRatFinder your callsign cell will have a yellow backtround, and for users of the map extension to the K1RZ/W3SZ database your marker color will also be yellow. On the other hand, if you select the choice "Fixed / OnBreak", then for other users of PackRatFinder your callsign cell will have a background color of coral, and for users of the map extension to the K1RZ/W3SZ Database your map marker will be colored dark brown. If you are a rover, then your status choices are "Rover OnSite", "Rvr OnSite/OnBreak", "Rover Traveling", and "Rover Problem". For users of PackRatFinder your callsign cell for your current grid will have background colors of red, coral, green, and cyan repsectively for those choices. For users of the map extension to the K1RZ/W3SZ Database your marker color will be the same color as was indicated above for the callsign cell in PackRatFinder for those choices. If you are a rover then your callsign cells for the grids that you are not currently occuplying will be yellow. Non-live rovers will have white backgrounds for their callsign cells. Note that if you are a rover and try to select a fixed station choice or vice versa, PackRatFinder will object and prevent you from making such an illogical choice. PackRatFinder will react in similar fashion if you are a fixed station attempting to select a rover-specific status choice. In both cases you will get a popup telling you that you made an inappropriate choice, and your station status will be changed to the appropriate "on break" status for your station type.
Additional color coding is used on the PackRatFinder display to indicate Pack Rat / Non-Pack Rat Status
and "Up to Date" / "Not Up to Date" Status of each station's information in the K1RZ/W3SZ Database. This is
is covered in Section 9, below.
In the image below, K1DS/R is
currently in FN20IG and so that callsign cell has a red background and the other K1DS/R callsign cells have a yellow background. K0BAK/R is currently traveling, so his callsign cell for that grid is
colored light green and is other callsign cells are colored yellow:
HOWEVER, if the rover has the capability to continue making contacts while traveling, then the rover should leave his/her status as "Rover OnSite" while traveling, making sure that the correct
grid location is updated as necessary while traveling.
5.2 Below is a "zoomed-in" look at a portion of the main
PackRatFinder display that I created while I was testing this
new feature of the software. You can see spots by K2TXB,
K2UYH, K2WB, K3BFS, K3BPP, K3GNC, and K3HUW. Note that K2UYH's
spots contain 2 decimal places, so they are likely generated
by N1MM+. K2TXB's, K2WB's, K3BFS's, K3BPP's, K3GNC's, and K3HUW's spots are whole integers,
and so they are likely manual spots. The first radio (the
first frequency column) is colored light-green, indicating
that this radio has the focus at K2UYH and K3HUW. The second
radio (second frequency column) is colored light-green
indicating that this radio has focus at K2TXB, K2WB, K3BFS, K3BPP, and K3GNC.
All stations are operating with two radios (SO2R).
5.3 It should be clear from the above that you want to
work K2TXB, your best best is to go to 50111 kHz; for K2UYH
you should go go 50127.75, for K3WB you should go to 144219,
for K3BFS you should go to 432145, etc. Even though all
of the stations except for K2UYH and K3HUW currently have
focus on their second radio, because of the narrow beamwidth
of the microwave antennas your best bet to catch K2TXB is not
to call him on 10368085, but as noted above to call him on
50111. Similarly, you should call K2UYH on 50127.75 and
not 2304143.990 unless you are extremely close to his
station. None of the stations shown here has spots that are
more than 5 minutes old, so there are no "greyed-out" spots. 
If you put the mouse at any point on the map and then use the keyboard command Cntl-Z while the map has focus, the rotor identified in PackRatFinder as the Main Rotor will move to that azimuth.
If you put the mouse at any point on the map and then use the keyboard command Cntl-X while the map has focus, the rotor identified in PackRatFinder as the Cntl-Rotor will move to that azimuth.
If you type Cntl-Q while the map has focus, then STOP commands will be sent to both rotors.

7.3
There has been some confusion about the point scores
given in the PTS column. This column displays the number
of points that you will get (not including multipliers) if you
convert all of the cells that are currently red to white for a
given station by working him her on all of the bands currently
shown in red. So the closer the sum of all of the
integers in this column gets to zero, the better you are
doing. If you work every PackRat on every band he/she
has available, then this column will contain only zeros! ,/p>

7.9 There are two states of the PRF display in terms of
sizing. The first state locks the sizing of fonts in the
DataGrid and the DataGrid elements at their current values.
This state is activated by checking the "Lock" checkbox on
the upper right-hand side of the PRF display. In this state
you can enlarge or shrink the overall size of the PRF display by
pulling on its borders, but the size of each element in the
DataGrid will remain the same. The controls at the top of
the display, above the DataGrid, will resize as you enlarge and
shrink the display so that all of the controls are always visible,
no matter what the size of the display.
7.10 The second display state is active when the Lock
checkbox is unchecked. In this state, you can enlarge or
shrink all elements of the PRF display by pulling on the borders
of the display. There is a maximum element size, which is
the default, and a minimum size, which is a bit less than 50% of
the default size. These two extremes are illustrated above.
They show exactly the same amount of data, just with
different scaling of the display.
7.11 Once you have found your optimal size for the fonts,
controls, and elements of the DataGrid, you can check the Lock
checkbox and then you can enlarge and shrink the overall size of
the PRF display without affecting the sizing of any of its
elements. Note that by default the comments in the last cell
for each station are always hidden beyond the right edge of the
window. To see them, lock the display and pull on its right
border (or use the horizontal scrollbar at the bottom of the
display), or simply hover over the call sign of that station and
they will appear in a tool-tip.
7.12 When you leave PRF, it remembers your sizing settings
and it returns to them when you restart it. It also
remembers the position on the screen for PRF and returns to that
position when restarted.
7.13 You can sort the Data Grid by Call, by Grid, by
Azimuth, by Frequency1, or by Frequency2. To sort by any one
of these parameters, just click on the header for the column that
you want to be the basis for the sort. The header background
for the sorted column will appear red and the headers for the
other sortable columns will appear green. When you perform an ascending sort by Call,
the individual grid entries for each rover will be displayed in chronological order.
You can reverse
the order of the sort for the call, grid, and azimuth columns by
clicking the header for that column another time.
Non-PackRats are sorted separately for the Call and Points columns
and placed at the end of the sort for an ascending sort, or at the
top of the sort for a descending sort. Non-PackRats are not
differentiated from PackRats for sorts based on grid, azimuth, or
frequency. If you double-left-click on one of the frequency
columns, it will be sorted by the age of the spot (ascending order
only) instead of by frequency, and the header background for this
column will appear yellow as is shown below. I have hovered
over the first listed entry in FREQ1 so that you can see that
after the sort by age it is zero minutes old:

8. Give Me A Break Feature

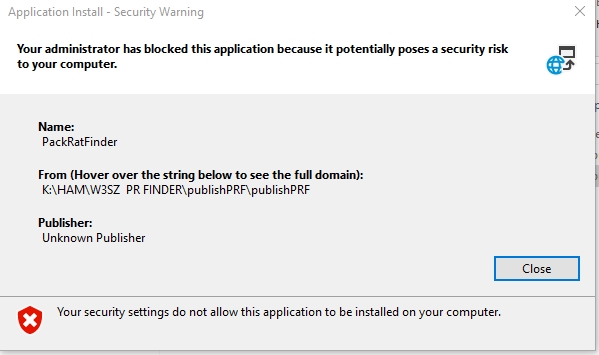
If you already unzipped this zip file without following the above instructions, then delete the publish.PRF folder that you created by unzipping it, this time follow the above instructions, and then unzip it again. The installation should now proceed correctly without giving you an image like the one below, which you likely saw if you did not follow the instructions above.
Once you've successfully done the above, you will have a directory named "PublishPRF" that has the setup files
that the program needs to install. Double-click setup.exe and PackRatFinder will install. Note that if you previously
installed PackRatFinder, you must uninstall the old version before installing a newer version.
When the installation has completed, a desktop shortcut named "PackRatFinder" will be created from which you can run PackRatFinder.
In addition, at least if you are running Windows 10, a new folder named "W3SZ" will be created in the Start Menu. That folder
will have both a shortcut to start PackRatFinder and a link to this web page so that you have user help handy. If you are
running Windows 7, the W3SZ Start Menu folder may not appear, but if that is the case for your installation, then "PackRatFinder" will appear as a Start Menu item.
Section 2 above, "Getting Started", will explain in detail how to set up the program.